怎样用Photoshop制作艺术字

 时间:2024-11-19 05:55:12

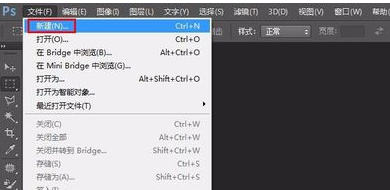
1、打开PS,在菜单栏“文件”中选择“新建”。

怎样用Photoshop制作艺术字

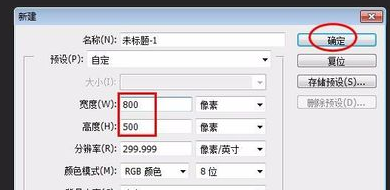
2、新建背景图层,大小为:800*500(可以根据自己的需要自行调整)。

怎样用Photoshop制作艺术字

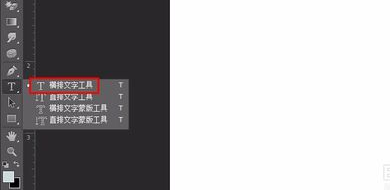
3、选择文本输入工具按钮,选择文字横排输入。

怎样用Photoshop制作艺术字

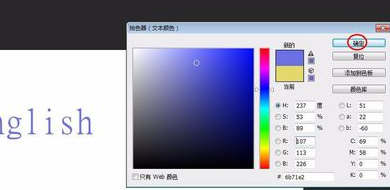
4、按照自己的需要选择字体颜色,选完单击“确定”按钮。

怎样用Photoshop制作艺术字

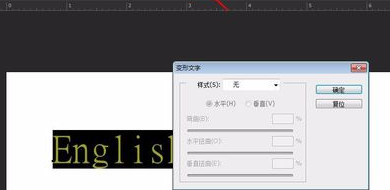
5、单击红色框中标记的工具按钮,弹出字体样式对话框。

怎样用Photoshop制作艺术字

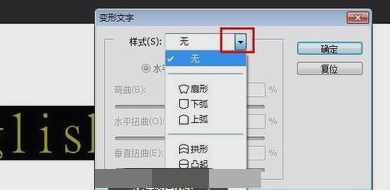
6、单击红框线标记的下拉子菜单按钮,选择需要的字体样式。

怎样用Photoshop制作艺术字

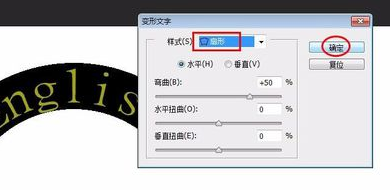
7、这里选择“扇形”,然后单击“确定”按钮。

怎样用Photoshop制作艺术字

8、选择“移动”工具按钮,移动文字位置。

怎样用Photoshop制作艺术字

9、同时按住Ctrl和T键可以变换字体大小和形状。

怎样用Photoshop制作艺术字

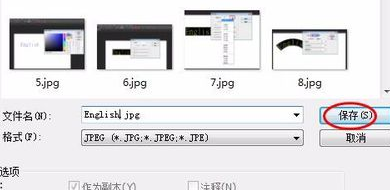
10、在菜单栏“文件”中选择“存储为”选项。

怎样用Photoshop制作艺术字

11、选择存储路径,单击“确定”按钮。

怎样用Photoshop制作艺术字

12、弹出的对话框单击“确定”按钮即可。

怎样用Photoshop制作艺术字
  • ps怎么做艺术字
  • PS中将图片图片置入的三种方式
  • ps的字体怎么变大
  • ps怎么制作花式艺术字
  • ps用画笔怎样擦掉不要的部分
  • 热门搜索
    电脑中病毒了怎么办 磨砂膏怎么用 cpu型号怎么看 怎么打印 泰拉瑞亚怎么钓鱼 抖音怎么玩 怎么取消页眉 大龙虾怎么做 今朝装饰怎么样 身份证丢了怎么补办